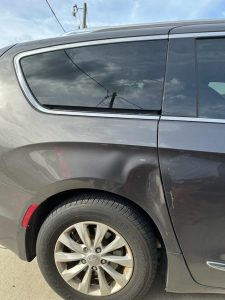
Minor dents and dings on your car are inevitable. It can be from a stray shopping cart in a parking lot or a small accident in your driveway. When small blemishes like this happen on your vehicle, you may not need to call a professional to get rid of them. With a dent repair kit and a little know-how, you can remove those dents and get your car looking spotless again.
If you don’t know how to use the tools in your dent repair kit then this article is tailored just for you. Join us as we show you some of these tools and how to use them.
Common Tools You Should Have in Your Dent Repair Kit
Before we give you a step by step procedure for remove blemishes on your vehicle, here are some tool you should have in your dent repair kit:
- Glue gun and sticks: You’ll need this tool for attaching pulling tabs to the dent.
- Pulling tabs: This tool comes in various sizes for different dent dimensions. Make sure your dent repair kit has all the sizes.
- Pulling bridge or T-bar tool: You’ll need this tool to apply the necessary force to pull out the dent.
- Plastic scraper: When you’re done applying the glue you’ll need a plastic scraper to remove the glue residue.
- Alcohol spray: If you notice that there is still some glue residue left, you can use an alcohol spray to remove the glue .
- Instruction manual: An instruction manual will help you understand the specific steps for your kit.
How to Use a Dent Repair Kit Effectively

Are you ready to get rid of those dents on your vehicle? Here’s a step by step procedure to remove those blemishes with a dent repair kit.
- Prepare the surface: Before you start your dent removal process, ensure you use soap and water to clean the spot properly and then dry it to remove the dirt and debris that can affect the adhesion of the pulling tabs.
- Heat the dent (optional): If you want a better result when removing a large or more complex dent, try and heat the dented area with a hairdryer or a heat gun. This makes the metal more pliable and easier for you to manipulate.
- Attach the pulling tab: After heating the dent, apply a generous amount of hot glue to the flat side of your pulling tab using a glue gun. Place the tab in the center of the dent and hold it until the glue sets. After a few minutes, attach your pulling bridge or T-bar tool to the tab and pull gradually to remove the dent.
- Remove the glue and tab: Spray the area with alcohol to soften the glue, then gently remove your pulling tab and glue residue with a plastic scraper.
- Inspect and repeat if necessary: Inspect the area and, if the dent remains, repeat the process. Finally, polish the area with a microfiber cloth to remove any remaining glue residue.
When to Call an Expert
Using a dent repair kit can easily remove vehicle dents, save you time and money, and provide the satisfaction of DIY repair. For large or persistent dents, call an expert to avoid bigger issues.
Are you living in Florida or nearby? Auto Dent Fix It is the right dent and scratch repair shop near you. We can help you get rid of those tough dents in no time. Our services are top-notch and affordable. Contact us now.
Frequently Asked Questions
Can I really remove dents from my car by myself?
Yes! With the right dent repair kit and some patience, you can easily remove minor dents and dings on your own. It’s a great way to save money on professional repairs for small blemishes.
What kind of dents can I fix with a dent repair kit?
A dent repair kit is most effective for small to medium-sized dents, like those caused by shopping carts, door dings, or small accidents. Larger or more complex dents may require professional assistance.
Do I need to heat the dent before using the repair kit?
Heating the dent is optional but can be helpful for larger or more stubborn dents. Using a hairdryer or heat gun makes the metal more pliable, which can improve the effectiveness of the dent removal process.
How long does it take to remove a dent using a repair kit?
The process typically takes around 30 minutes to an hour, depending on the size and complexity of the dent. If you need to repeat the process, it may take a little longer.
What if the dent doesn’t come out on the first try?
No worries! If the dent is still visible after your first attempt, simply repeat the process. Sometimes it takes a few attempts to completely remove a dent, especially for larger or deeper ones.
